This is a step by step guide on running a test program that performs simple color conversion via OpenCV GPU module using Microsoft Visual Studio. You can download the sample source file at the end of this tutorial.
Create a new Microsoft Visual C++ project. Add the source file (available at the end of the tutorial) and add it to the project. Currently, the code will not compile, because the paths to OpenCV header and library files are unknown to the compiler. Let's first set environment variables for OpenCV folders in our system for ease of use
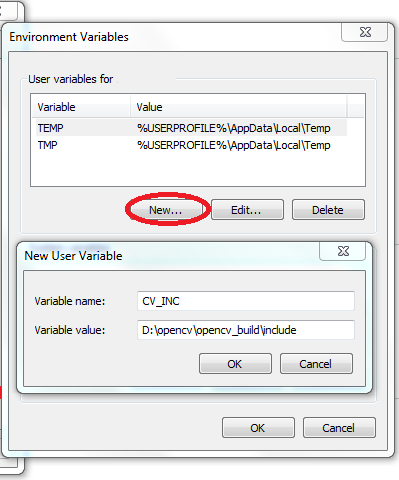
Setting Environment Variables
To create environment variables, go to System Properties. In the Advanced tab, click on Environment Variables. Click on New in the User Variables section. Set Variable Name to CV_INC. In the Variable Value box, paste the path of the OpenCV header files directory ( in our case it's D:\opencv\opencv_build\include). Similarly create environment variable for lib and bin folders as:
Variable Name: CV_LIB32
Variable Value: D:\opencv\opencv_build\lib\Release (or your directory)
Variable Name: CV_BIN32
Variable Value: D:\opencv\opencv_build\bin\Release (or your directory)
You environment variables are now set. In future, you can use these variables to point to include, lib and bin folders of OpenCV.
Setting Up Visual Studio
Go to Project Properties > C/C++ > General and add $(CV_INC) to the Additional Include Directories box. In the Linker >General add $(CV_LIB32) to the Additional Library Directories box. The dollar "$" symbol indicates we are using the Environment Variable that we created previously.

Next, we have to specify the library files (.lib) of all the OpenCV modules which we are using in our code. The core module is always used. All others depend on the code. In this example code (available for download at the end of this tutorial) we are using core, highgui, imgproc and gpu modules. Note if we skip this step, we will get the Unresolved External Symbol error while building the project.
Go to the the Linker >Input. Open the Addition Dependencies drop down list and click <Edit...>. Add the library name of the required modules as shown below

Close the project properties and build the project. The project should build without any errors. Kudos! You have almost made it but wait a second. If you run the project, it will show an error saying a .dll file is missing. This is because the project doesn't know yet where to find the required .dll files.
If we put the OpenCV dlls in the same directory as our project executable, the error will be gone. But instead of manually copying the dlls each time, we will add a script to copy them automatically to the output directory of our project. This can be done as follows:
Go to project properties. In the Build Events > Post Build Events, click the Command Line drop down list, and click <Edit...>.
Add the copy command for each required module as follows:
copy "$(CV_BIN32)\opencv_core246.dll" "$(OutDir)"
copy "$(CV_BIN32)\opencv_highgui246.dll" "$(OutDir)"
copy "$(CV_BIN32)\opencv_imgproc246.dll" "$(OutDir)"
copy "$(CV_BIN32)\opencv_gpu246.dll" "$(OutDir)"
Close the project properties and rebuild the project. The program should run without errors.

Download: cv_gpu_example.zip